More work on the system

Tonight there’s a full moon.  Normally that’s not a great time for star gazing but it doesn’t matter so much when you use a camera.  I’m out at my observatory in northwest Arizona and the weather is fantastic (as usual).  The goal for tonight was to setup the entire system and get an inventory of cables or gear that is need to make the systems complete.  I also picked up a few ideas for how to better run our systems along with a few lessons learned.

The DVR is going to be a tricky beast to keep under control.  It seems that when it’s first turned it immediately begins recording.  A nuisance as long as you know about it.  There’s also a configuration setting relating to recording length.  What this really means is that if you set it for 5 minutes, then after 5 minutes of recording, it will stop recording, save the file and then immediately start another recording.  No matter what, you still have to tell it to stop recording.  Another issue that’s going to take more study is power.  Our DVR has a built-in battery but I haven’t figured how long it’s good for.  If we need to power the unit we’ll need some type of power converter.  The simplest thing is a DC-AC converter.  But, if the battery has a USB connector we might be able to power it from that.

Setting up the camera and IOTA-VTI box does require a few cables, some of which came with the equipment and some not.  We’ll need one BNC to RCA video adapter, a couple of DC power cables, and a power splitter cable.

I also had a bit more practice with the telescope.  For now I’m using the stock finder but I really don’t like it.  I see that it definitely affects the balance of the telescope, making it more tail heavy.  Tonight I used the default “Sky Align” option on the telescope.  I was able to do this while it was quite bright out, in fact, this is the perfect time to do so since you will certainly get the brightest stars that are needed for the alignment procedure.  I did a little bit of testing of the telescope’s ability to find objects.  It worked reasonably well but perhaps not as good as what I’m used to on my old telescope.  Perhaps that’s just because I know the old one better.

I did look at the power connector issue a bit as well.  I got a great suggestion from Dean at Starizona and I tried it out tonight.  He said to take the power cord and tie it around one of the forks and then plug it into the base.  This way, as the telescope moves, the fork pulls the cable around and it avoids putting stress on the power connector.  For me this worked just fine, at least this night.

At the end of my testing I’ve got some video data saved that I can dig into to learn about data quality and timing information.  I want to get reasonably good values for the field of view with and without the focal reducer as well as some idea of how faint this camera can get.

First night with the system

Well, last night I got a chance (finally!) to try out the new equipment.  I got the cameras on Friday (all 14 of them).  We still don’t have some of the accessories for the telescope, most notably the Telrad finters.   But, I had enough to let me try everything out on the sky  with the full set of equipment.  I learned a few things that I’m still digesting.  One thing was that my personal telescope, a Celestron Nexstar that was the basis for the early work on this project, now has to qualify as an old telescope.  I don’t know how that happened but I’ve had it for 11 years now.  Still seems new to me.  Anyway, Celestron has clearly been busy over that time and the telescope shows signs of many improvements.  More interestingly, I was able to take it out and get it running without reading the manual at all.  Yes, the hand controller is quite different now but I managed ok.  Eventually I’ll read the manual in time.

I was able to get the Mallincam Special camera on and take images of the sky through the focal reducer.  The star images look really good, at least on the monitor.  I’m still working on how best to deal with the video images that come out of our video recorder.  There are a few things that are clear now.  1) the video recorder (DVR) looks like it will work but has some operational peculiarities that I need to document.  The device somehow decided to change video formats during my short tests and I need to figure out why and how that happens.  2) I still need to get memory cards for the DVR.  These are on order now.  3) A bigger monitor is certainly nice to have and I have a good option picked out if we have to go this way, but, the DVR screen is pretty good on its own.  4) getting power to the gear and routing the video lines is tricky.  There aren’t that many wires but they seem to mulitiply in the dark.  I had a real rat’s nest going there for a while.  I also need to come up with some additional power cords for the full system.  I was using my pile of engineering gear and I’ll have to do a census on the remaining items that will be needed.  Once that’s done the cameras should be ready to be sent out, most likely in early March.  I will be running additional tests on the camera next week while I’m at my observatory in Arizona.  I haven’t yet decided if I’ll bring the new telescope along for the ride or just stick with my trusty (old) scope for now.  I guess it depends on how full my car gets.

Telescopes have shipped!

The telescopes for our project have just shipped today!  All of the site leads should be on the lookout for a package with the telescope, finder, and extra eyepiece.  I expect this will begin to make the project feel real when you see some of the actual equipment.  Additional logistical details will be sent to the site leaders.

Telescope Order Placed

Big news!  The order was just submitted for our telescopes to the purchasing department.  There are no shipping estimates yet but the leaders will get that once the information becomes available.  The vendor knows that we need this stuff in hand no later than mid-March but we should expect the equipment to arrive earlier than that.  There will be more instructions regarding the equipment as the delivery dates get closer but rest assured that things are moving right along.  Note that this shipment is coming directly to each team and will include the telescope, a Telrad finder, a dew shield, and an extra eyepiece.  For most of you this has just been an intellectual exercise but it’s going to start to feel real once you have some equipment in hand.

Early occultation opportunity

Steve Preston of IOTA has a list of the best occultation events for 2013.  These events are chosen for bright stars and ground-tracks with small errors.  In other words, these are the easiest events and worth special scrutiny for larger campaigns.  However, these are not filtered by area and cover the entire globe.  Of these events there is only one that is relevant to the RECON network and it happens before we’ll have all of the telescopes and cameras in everybody’s hands.  However, there are some of you that will be able to look at this, either visually or with any cameras I can get out quickly enough.

The event is at 2013 Feb 11 06:48 UT.  The actual time will differ by a minute or two depending on your location.  This event is on Sunday night, Feb. 10 at 22:48 (10:48 pm).  You can see more details about this event at Steve’s website.  According to the prediction, our two most northern sites will likely be out of the shadow track but everyone else will be in the track.  If this event were just a couple of months later we would make this one of our official campaigns.  Unfortunately, the timing isn’t right but I wanted to make sure everyone knew of the opportunity in case they want to do something.  I will be happy to provide support and answer questions for anyone that needs help.


December Testing

Wednesday, Dec. 5

I’m at my observatory in northwest Arizona now (near 35N, 113W) after a long 14-hour drive from Colorado.  It’s always nice to get out here again.  The peace and quiet is quite impressive as are the sunsets and the night sky views.  I have four cameras and two focal reducers to test all on my own 11-inch telescope.  Given the weather forecast it may be a couple of days before I get clear enough conditions to do anything useful.  That’s something of a pity since the weather as of now is remarkably mild for this time of year.  By the time it clears up the temperature is supposed to drop by 20-30 degrees.  Normally in December I see lows in the teens (or colder) and highs in the 40’s.  Today it got up to the upper 60’s.  Watch these postings for updates on results from this activity.  I have until Sunday night to get some results.  Most likely, Friday night will be the best.

Thursday, Dec. 6

The weather cleared up this afternoon, earlier than expected.  The skies are beautiful tonight.  I’m writing this while I warm up a bit.  It’s almost 10pm and the temperature has dropped down to 33F.  I’ve suffered much worse while observing but it’s still nice to come in a warm up for a bit.  The testing is going quite well and I’ve already got a lot of critical data.  I need to process this carefully after getting some sleep but I can already tell that I have 4 good candidate cameras.  I think I even have a clear winner but I don’t want to say so until I’ve had a chance to analyze the data.

Friday, Dec. 7

Another beautiful night but yet again colder than the previous night.  Last night had borderline issues with frost but it is drier tonight and no such problems this time.  I have even more data now for checking out the cameras.  In fact, I think I have all I need at this point and I need to spend more time in front of the computer instead of playing outside.  I made some progress on processing last night’s data but not as much as I’d hoped.  Somehow the software was no longer on my laptop for reading the video files and it took some time to figure out that problem.  I did get as far as figuring out the image scale and thus the field-of-view of the cameras.  That alone is a big help.  Now I have to finish the task of seeing exactly how faint these cameras can go.  Right now it looks like the Mallincam HyperPlus and the Watec 120N are tied for the lead with the Mallincam JR running a close second and the Super Circuits PC165DNR coming in third.  But, the final word will come from the data itself.

Saturday, Dec. 8
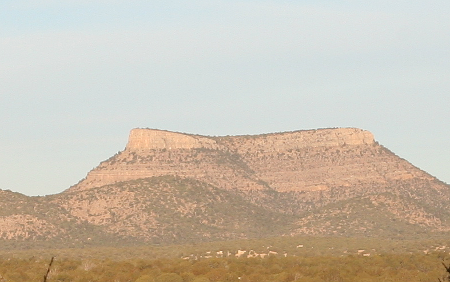
This is Cross Mountain. It is prominent on the horizon from my dining room window of the house at my observatory. It’s a welcome sight each morning at breakfast watching the sunrise settle in over this mesa. If you were driving on I40 between Kingman and Flagstaff you would drive just north of this formation (maybe 20 miles west of Seligman).

One of the conclusions that I’ve already reached is in the choice of focal reducers.  I’m testing two, one made by Meade and one by Mallincam.  As far as I can tell these two provide essentially the same result.  The main difference between the two is in how they mount to the telescope.  The Meade unit screws directly on to the back of the telescope and requires a special adapter to a video camera.  The adapter I have was specially made for me by friend and fellow occultation enthusiast, Gordon Hudson, who lives near Wellington, New Zealand.  He might be willing to make a bunch of these but I’d like a simpler solution.  The Mallincam unit screws on to the front of the video camera and is sized like an eyepiece.  This one will work with the stock parts that we’ll be getting with the telescope and is definitely the simpler way to go.  Almost all of the tests I’m reporting on here were done with the Meade optics but the results would have been the same with the Mallincam.

I spent most of the day looking at the data.  I took some longer video sequences that were about 5 minutes long that were intended as simulated occultation event data.  I ran into a snag with breaking these files apart into their component images.  The software I was using to do this completely failed using it’s default values.  After a while I was able to discover how to get it to work but doing so was at the expense of speed.  It took my laptop just over an hour to split up a single 5 minute video file (creating over 12,000 individual images).  This process went late into the night and as a result I have still not finished my analysis.  I did learn a few interesting things along the way.

The first thing I looked at was the timing.  The video record superimposed its clock on the display and I figured out how to know when the time display changed.  This allows me to accurately time every frame.  The video frame rate is supposed to be exactly 30 frames per second.  That should mean the time code would change every 30 images, without fail.  Well, this is almost true.  It is definitely true over a long time span, whether for 30 seconds or 5 minutes.  But, within this time I saw the frame count between time code changes to be 29, then a couple of seconds later it would be 31 which would bring it back to the correct time line.  This is an important detail for when we have real scientific data but it’s really just a distraction for the camera testing.  In the end I had to put this problem aside and I’ll have to get back to this on some later date.

The second thing I looked at was to see if I can tell when the images change in the video.  All of these cameras have a feature that allows reaching fainter stars than a simple video camera can reach.  This is known as either frame integration or “sense-up” and the unit is the number of frames like x2 or x16 (usually a power of 2).  A normal video camera will spend 1/30 of a second looking at the scene before that recorded light must be converted onto the video output.  So, if you integrate two frames (x2) it will be like taking a longer exposure time.  In this case, it would be 1/15 of a second between changing the video output signal.  Now, the video signal cannot change it’s speed.  Thus, a camera that does this must work to duplicate the integrated frame on the video output so that the video stream has 30 frames per second.  When you look at the video on a monitor, the images clearly don’t change as rapidly when you go to ever larger integration times.

For our project, we need to be able to work with fainter stars.  I have estimated that x16 is the longest we can go (that would an exposure of 16/30’s of a second or just long than half a second).  I’ll write up more about this limit later.  Here’s the problem: when analyzing the video image stream, you must know when the image changes since this tells you where the start and stop of the frame integration is.  If you don’t know the boundaries your time can be off by up to the frame integration time and that is not good for us.  Now, I know that I can see this effect looking at the monitor but the trick is to teach the computer to recognize this transition between frames.  Sure, I could do it by hand, but if I want to know when every transition occurs it will take me a very long time.

Most of my day was spent devising algorithms to sense the frame change.  I have not solved this problem to my satisfaction yet and that’s very frustrating.  On the other hand, my efforts have at least identified a key issue for these cameras and one that must be solved for future scientific use of frame-integrating video cameras for occultations.  Without getting into all the details, I came up with something that works reasonably well on some of the data I collected.  The results surprised me.  My baseline camera, the Watec 120N+, works the way I expect.  Every 16 frames the image does indeed change.  Depending on the data, I can see changes more often than that but in my best example I only have a 2% false trigger rate (that’s where I think the frame changed but it didn’t).  None of the other cameras were as easy to understand.  The Mallincam Hyper Plus was similar but had a higher false trigger rate.  The Mallincam JR and the PC165DNR have proven so far to be impossible to tell when the frame changes.  My techniques that worked on the Watec will either say the frame never changes or it is always changing.  Clearly, there is something about these newer cameras that I do not understand.  I either have to decipher what’s going on using the data or talk to the manufacturer to get an explanation.

At this point I have to switch gears and work on other projects for a while.  I’ll revisit the data analysis in a few days but at least I know that I have the data I came to Arizona to get.

Shopping for cameras

It’s been a busy couple of days researching cameras for our project.  The original project design was based on the use of a Watec 120N+ camera.  This camera has the ability to integrate longer than a normal video camera.  This slows down the actual frame rate of the data but it lets you see fainter stars.  Unfortunately, Watec has announced that they have ceased production of this camera.  It is still possible to get these but under the circumstances it is good to investigation what other cameras might be out there.

Based on the experiences of the IOTA community and specifically from Tom Beard in the Carson City, NV area, there are other cameras worth trying.  The first is a really cheap camera from Super Circuits, called the PC165DNR.  It’s almost too good to be true at this price but I’ll give it a look.  The second is intermediate in price and is the MallinCam JR.  I plan to get my hands on one of each and then test them myself in December.  On paper it seems like the MallinCam would be the optimum choice but the proof will be in the test data.

Recruiting south of Reno

Aside

Last week I was in Reno for the Division of Planetary Sciences meeting. This meeting is held each year in a different location and provides a forum for those of us that study the solar system can get together and share our latest research results. Next year at this time I hope to be showcasing the results from our project. But first, we have to assemble the team of participants for the project. I had to drive south to Las Vegas after the DPS meeting so that I could talk to members of the International Occultation Timing Association (IOTA) about how they could participate in our project. Along the way between the two meetings I had a chance to meet with prospective team members.

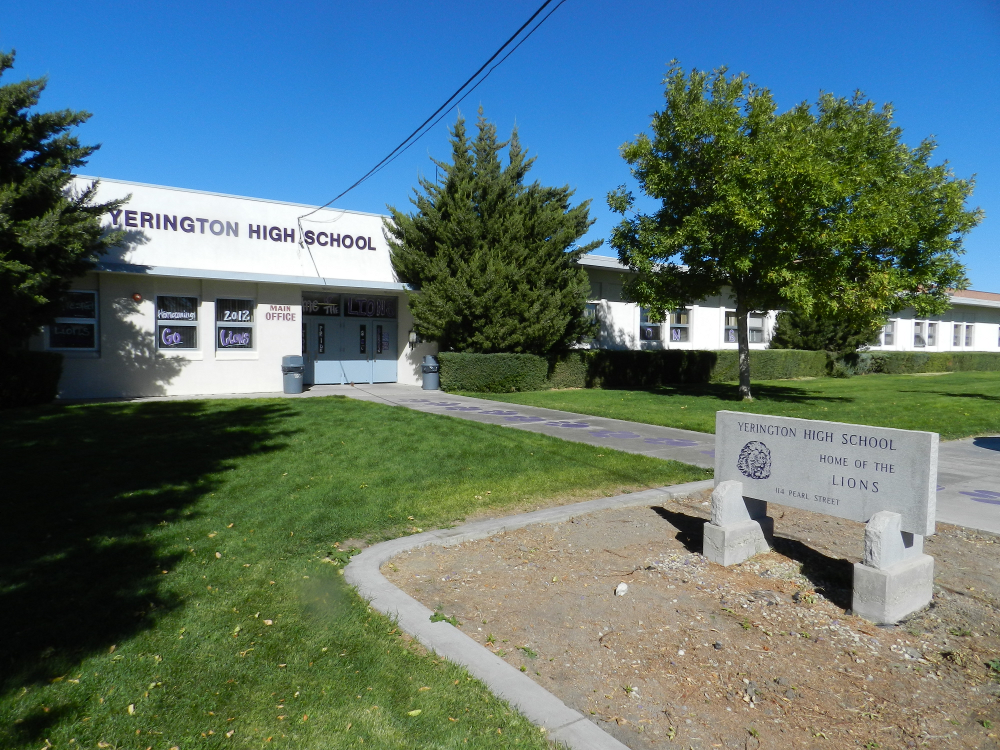
Yerington High School in Yerington, Nevada.

My first stop was in Yerington, Nevada.  I received a very warm and enthusiastic welcome here. The teachers were very excited about being a part of the project and I could tell they were already thinking of ways to use the project in their classes and how to enhance student involvement with multi-year participation in our project.

Mineral County High School in Hawthorne, Nevada

The next stop on my trip was in Hawthorne, Nevada. The biggest feature of the town is the nearby Army munitions base. At the school I was able to talk with an 8th grade earth science class and a 10th grade physical science class and tell them about exploring the Kuiper Belt. At this location I found the first strong community supporter in addition to the enthusiastic school response. The view from the back of the school across the ball fields was very nice. This will make a really good observing location.

Tonopah High School in Tonopah, Nevada

The third and final stop on this trip was in Tonopah. A small mining town nestled in the mountains. This is a community that is starting to embrace its locale in being able to provide access to dark desert skies.  In this community there is a strong component of educators working closely with astronomy enthusiasts.

With these first three site visits, the RECON project is off to a great start.  We’re looking forward to more visits and the opportunity to work with all of these folks.