Using Google Chrome will show a progress bar in the lower left-hand corner
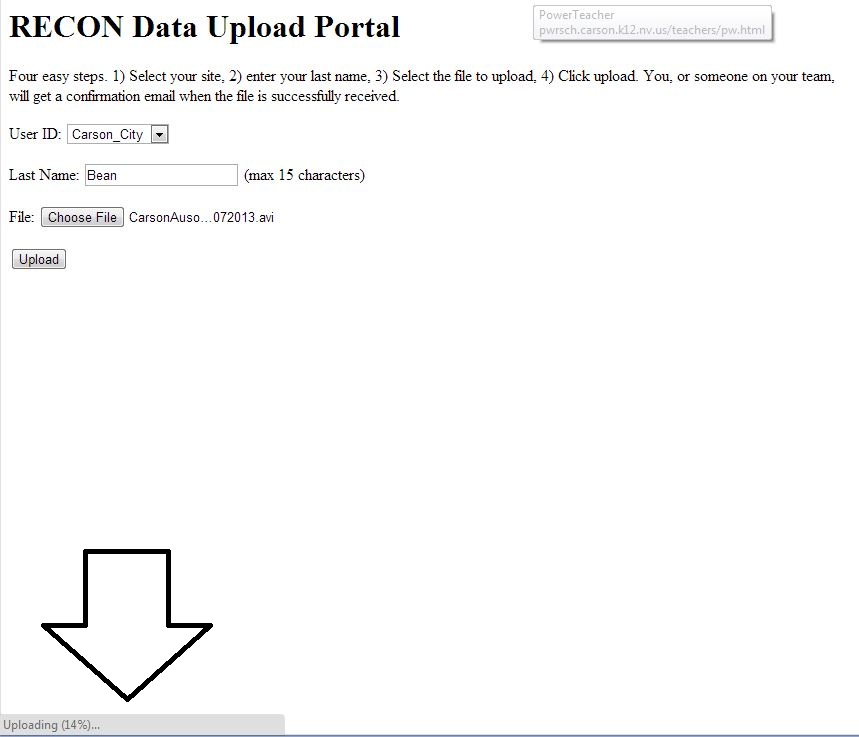

Using Google Chrome will show a progress bar in the lower left-hand corner
 Objectives:
1. Construct an Excel graph of an asteroid occultation using video data and video software.
2. List and explain the steps involved in making observation –> collecting data –> processing data –> displaying data for interpretation
Key Vocab: Occultation, Light Intensity/Flux
Procedure
1. Visit & Download: Virtual Dub
2. Visit & Download: LiMovie
3. Obtain & save video data of an occultation event (raw-data)
4 Run Virtual Dub
5. Run LiMovie
Video Longer than 68-seconds
OTHER LINKS
Courtesy of www.occultations.net
These have been busy days since the Kitt Peak observing run. Those observations are critical for us to help find interesting occultation events to try but they are of no use in the form of images. But that comment I mean that the easy part is over once the pictures are taken. There’s a lot of image processing and analysis that is required. I have to calibrate the images as well as map the sky coordinates. After that I have to scan the images looking for all the moving things. Most of the moving objects are main-belt asteroids but a few of them are the slow-moving Kuiper Belt objects that are our targets. Once all these objects are found I then extract their positions and use that information to improve the orbits. Good orbits are the key to letting me predict where these things will be at some future time.
This work, while difficult and time consuming, is made easier by the software that I’ve developed over the past 15 years. One of the nasty realities in professional astronomy is that there is very little standardization in the data I get. Usually, I can count on data from the same camera having the same data format. But, this observing run was with a camera that I’ve never used before. Even though this camera is on a telescope I’ve used, the data are just different enough that I had to rework a lot of my software. In the process, I discovered that there was a serious problem in the supporting data. One of the key bits of information I need to know is exactly when each picture was taken. Without a good time, the observations are useless for our project. Well, it turns out the times recorded by the camera was incorrect and off by as much as 12 minutes. That may not sound like a lot to you but to me it’s huge. Want to know how I figured this out?
Well, it’s like this. Time on telescopes like this is very precious and I work very hard during my nights to make sure that I’m getting as much data as possible. The ideal thing would be to be collecting light 100% of the time. Unfortunately, there are unavoidable times when you can’t collect light. After each picture we have to stop and read out the image and save it to the computer disk. This camera is quite fast and can store the 16 mega-pixel image in about 25 seconds. Not as fast as a commercial digital camera but then it’s much more precise and getting that precision requires a little extra time. Now, each picture takes about 4 minutes to collect (that’s when the shutter is open and I’m integrating the light coming through the telescope). If the readout were the only time I’m not collecting light then I could hope for 91% efficiency. That’s pretty good. But, there are other things that can eat into your observing efficiency. For instance, the telescope needs to be moved between each picture. If it can be moved and setup in less than 25 seconds there is no extra overhead. Also, if I’m not very organized I might be sitting there in the control room trying to figure out what to do next and the system would be waiting on me. Well, I have control over my part of the project and I always know what to do in time. But, the telescope motion turned out to take longer than the readout of the image. While observing I knew that we were losing time to moving the telescope but I didn’t know exactly how much.
Ok, so here I am looking at all the new data. I was wondering just what the efficiency was. So, I wrote a simple program to calculate how much dead time there was between each exposure. It really is simple to do, you take the difference in the start time of two exposures and then subtract the time the shutter was open. The remainder is the overhead. Well, to my surprise, the numbers came out very strange indeed. About overhead of about 20% of the images were negative. Do you know what that means? It implies that some exposures were started before the previous image was completed.
That’s impossible! After checking that my quickie program was working right, I then turned to my backup source of information.
One of my ingrained habits while observing is that I record a hand-written log of what I was doing. These days most astronomers rely on automated and electronic logs that are based on what the data system knows. Not me. I record information about each picture as an independent check on the system. Most of the time everything is fine and the logs are somewhat superfluous. This time, I was able to use the start times I wrote down to show conclusively that the data system was messed up. I sent a report back to the observatory and after considerable effort were able to verify the problem, what happened, and then a manual recipe for fixing the data based on their backup information. What a mess. This detour consumed the better part of 3 days worth of work.
Well, no need to recount every last thing I’ve been doing the past couple of weeks. But, at this point I’ve scanned about 1/3 of the data. I successfully recovered 29 out of 36 objects I was trying to get. I had to write an observing proposal to do this again in the fall. I asked for three more nights. The data processing continues on the rest of the data. On top of this, we’re planning the details for the upcoming training workshop next week. I’m very excited about getting together with everyone and getting everyone ready to observe. I think we’re going to have a great time together as we get this project up and running. We may have some challenges caused by the weather. The forecast is not perfect but I’ll note that it is much better than the weather this weekend.
On Tuesday morning I get on the California Zephyr train, yes, a train, to get to the workshop. This will be a nice break from flying around the world. The scenery should be excellent on the ride and I’ll have time to continue to work on getting ready for the workshop. I want to thank all of you signed up to participate. This project is a lot of work but I’m grateful for your willingness and enthusiasm to be involved in the project. I can’t do it without you and together we’ll amaze the world. For those coming to the workshop, drive safe, and we’ll see you in Carson City!
The RECON Spring Training Workshop begins next Thursday!!!
We have posted details for workshop attendees under Participant Resources
Here I am in the control room of the Mayall 4-meter telescope on top of Kitt Peak in southern Arizona. This telescope is operated by the National Optical Astronomy Observatory on behalf of the National Science Foundation. The goal of this observing run is to check in on as many Kuiper Belt objects as I can and measure their current positions. These measurements help improve the orbits and thus make it possible to more accurately predict their positions. We need this for RECON because I need to be able to predict when one of these objects will pass in front of a star.
The weather has been great and I’m getting lots of objects. The goal was to measure 100 on this run and that should be about right. It’s pretty exhausting work to keep track of everything and staying alert all night long. The only break time I get is time for a little sleep and then I always watch the sunset. I’m here for three nights and I was able to see a green flash at sunset for two of the three. Also, there’s a nice little comet hanging out after sunrise (Comet PANSTARRS). It’s more of a binocular object but it’s there and you can see it even without aid.
Tonight there’s a full moon. Normally that’s not a great time for star gazing but it doesn’t matter so much when you use a camera. I’m out at my observatory in northwest Arizona and the weather is fantastic (as usual). The goal for tonight was to setup the entire system and get an inventory of cables or gear that is need to make the systems complete. I also picked up a few ideas for how to better run our systems along with a few lessons learned.
The DVR is going to be a tricky beast to keep under control. It seems that when it’s first turned it immediately begins recording. A nuisance as long as you know about it. There’s also a configuration setting relating to recording length. What this really means is that if you set it for 5 minutes, then after 5 minutes of recording, it will stop recording, save the file and then immediately start another recording. No matter what, you still have to tell it to stop recording. Another issue that’s going to take more study is power. Our DVR has a built-in battery but I haven’t figured how long it’s good for. If we need to power the unit we’ll need some type of power converter. The simplest thing is a DC-AC converter. But, if the battery has a USB connector we might be able to power it from that.
Setting up the camera and IOTA-VTI box does require a few cables, some of which came with the equipment and some not. We’ll need one BNC to RCA video adapter, a couple of DC power cables, and a power splitter cable.
I also had a bit more practice with the telescope. For now I’m using the stock finder but I really don’t like it. I see that it definitely affects the balance of the telescope, making it more tail heavy. Tonight I used the default “Sky Align” option on the telescope. I was able to do this while it was quite bright out, in fact, this is the perfect time to do so since you will certainly get the brightest stars that are needed for the alignment procedure. I did a little bit of testing of the telescope’s ability to find objects. It worked reasonably well but perhaps not as good as what I’m used to on my old telescope. Perhaps that’s just because I know the old one better.
I did look at the power connector issue a bit as well. I got a great suggestion from Dean at Starizona and I tried it out tonight. He said to take the power cord and tie it around one of the forks and then plug it into the base. This way, as the telescope moves, the fork pulls the cable around and it avoids putting stress on the power connector. For me this worked just fine, at least this night.
At the end of my testing I’ve got some video data saved that I can dig into to learn about data quality and timing information. I want to get reasonably good values for the field of view with and without the focal reducer as well as some idea of how faint this camera can get.
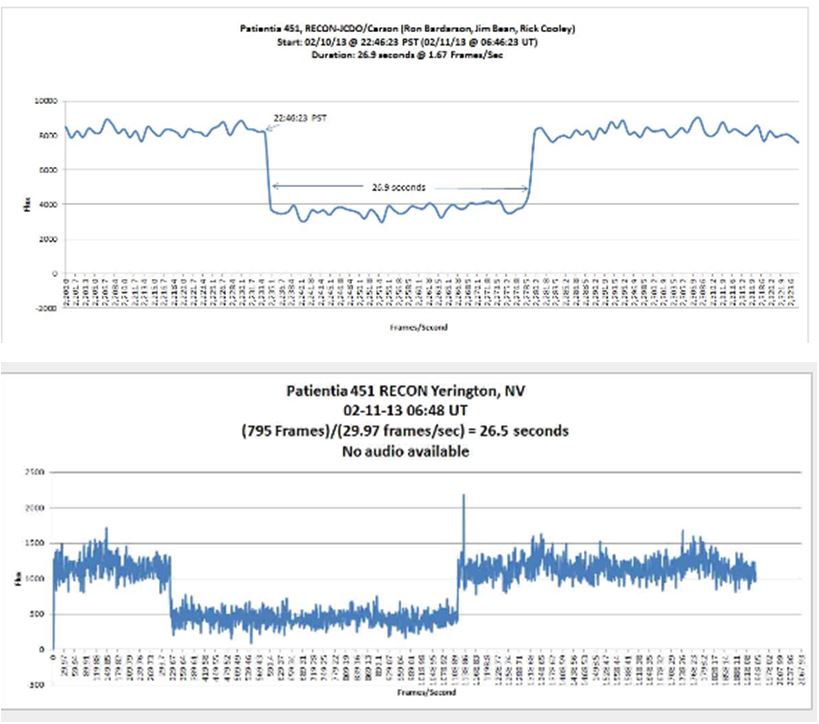
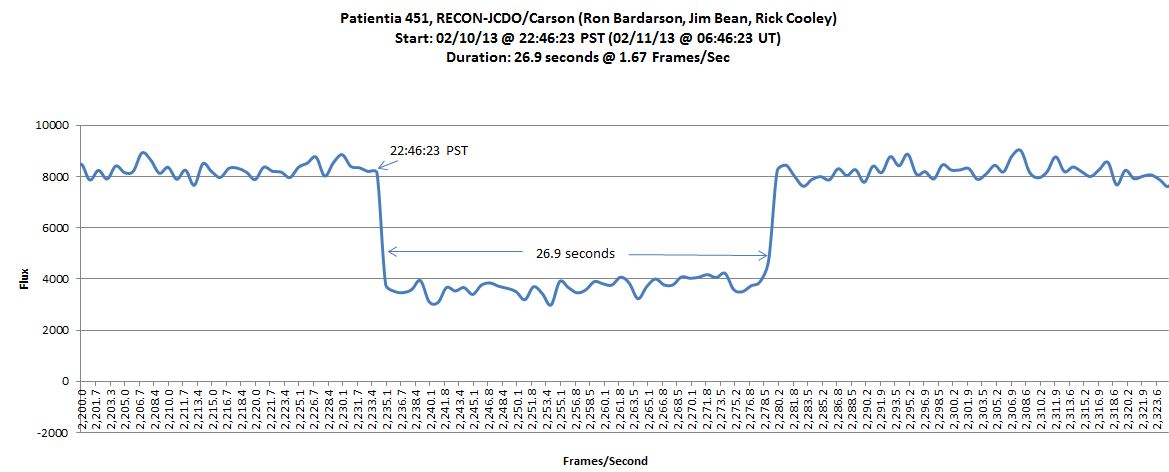
patientia 451 mov file. Video clip of the asteroid occultation Patientia 451 taken at the Jack C. Davis Observatory by RECON JCDO/Carson members Ron Bardarson, Jim Bean, and Rick Cooley
The day of the Patientia occultation dawned completely overcast here in Yerington and remained so the whole day, putting the event viewing in jeopardy. But we went ahead with our plans and gathered at the appointed time. The astronomy gods were with us because the sky turned out crystal clear.
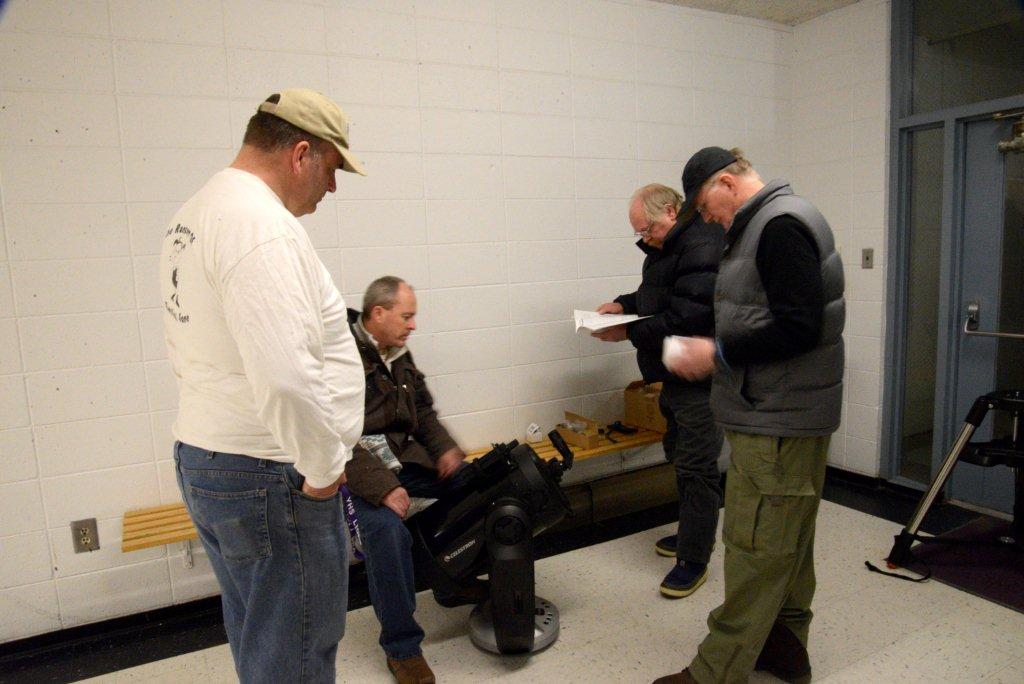
Scott, Todd, Red and Robert working through the setup of the new telescope.
Red Sumner and Robert Collier drove over from Carson City to walk us through the whole process and their help was invaluable. They are two very knowledgeable men. We had decided to meet at the football field at Yerington High School because we would have access to power and transporting the telescope would not be an issue. With Red’s help the scope was up and running in no time.
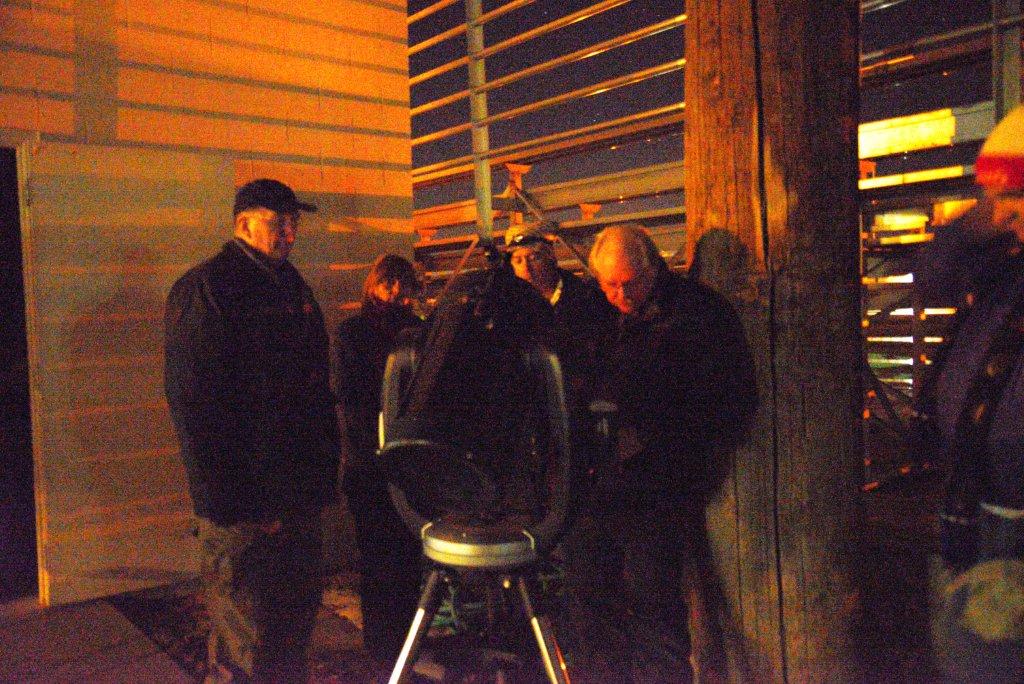
Red getting a feel for the controller.
The scopes first light was Sirius. We then had to look at Jupiter (of course). We were all very impressed. Then it was down to work. With the scope working, Red put in the coordinates for the Patientia event and then started to zero in on our target star. After several minutes he had it centered and tracking. He attached a video camera, and we were able to watch the entire event on his laptop. How cool is that? The occultation was successfully recorded and we wrapped up the evening. Below is the light curve showing the change in intensity of the target star as the asteroid passed in front of it.
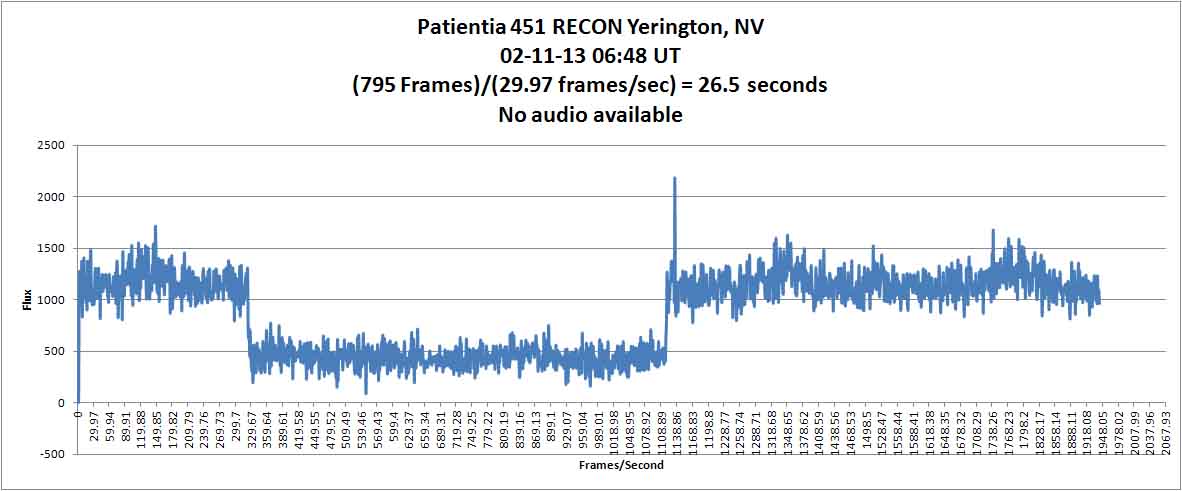
Thanks to Jim Bean for generating the plot
We all thought that this event was really cool, and it further heightened our excitement to get started officially.
Todd, Yerington High School
Well, last night I got a chance (finally!) to try out the new equipment. I got the cameras on Friday (all 14 of them). We still don’t have some of the accessories for the telescope, most notably the Telrad finters. But, I had enough to let me try everything out on the sky with the full set of equipment. I learned a few things that I’m still digesting. One thing was that my personal telescope, a Celestron Nexstar that was the basis for the early work on this project, now has to qualify as an old telescope. I don’t know how that happened but I’ve had it for 11 years now. Still seems new to me. Anyway, Celestron has clearly been busy over that time and the telescope shows signs of many improvements. More interestingly, I was able to take it out and get it running without reading the manual at all. Yes, the hand controller is quite different now but I managed ok. Eventually I’ll read the manual in time.
I was able to get the Mallincam Special camera on and take images of the sky through the focal reducer. The star images look really good, at least on the monitor. I’m still working on how best to deal with the video images that come out of our video recorder. There are a few things that are clear now. 1) the video recorder (DVR) looks like it will work but has some operational peculiarities that I need to document. The device somehow decided to change video formats during my short tests and I need to figure out why and how that happens. 2) I still need to get memory cards for the DVR. These are on order now. 3) A bigger monitor is certainly nice to have and I have a good option picked out if we have to go this way, but, the DVR screen is pretty good on its own. 4) getting power to the gear and routing the video lines is tricky. There aren’t that many wires but they seem to mulitiply in the dark. I had a real rat’s nest going there for a while. I also need to come up with some additional power cords for the full system. I was using my pile of engineering gear and I’ll have to do a census on the remaining items that will be needed. Once that’s done the cameras should be ready to be sent out, most likely in early March. I will be running additional tests on the camera next week while I’m at my observatory in Arizona. I haven’t yet decided if I’ll bring the new telescope along for the ride or just stick with my trusty (old) scope for now. I guess it depends on how full my car gets.
