
Your site will always achieve the best signal-to-noise when the telescope/camera system is best focused. Below are some advanced tips for achieving best focus.
Bahtinov Mask
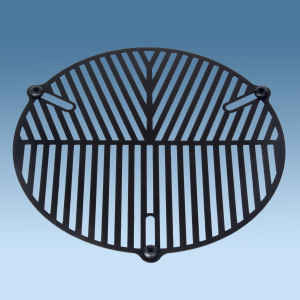
A Bahtinov Mask (hereafter referred to as BMask) is a circular mask consisting of a set of three diffraction gratings (shown here) that can be placed on the front end of a telescope to create diffraction spikes on the stars in the camera image. Most RECON teams have a BMask with three adjustment screws that can be slid inward to loosely clamp the mask to the outside rim of the telescope.
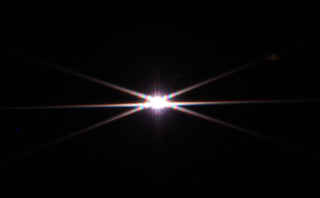
When placed on the front end of the telescope, the BMask creates a diffraction pattern that can be viewed through an eyepiece or camera that consists of of two diagonal spikes forming an X and a third horizontal spike that will move back and forth as you change the focus of the telescope.

Not focused
Not focused

In focus
When the horizontal spike is aligned with the vertex or center of the X, the telescope should be well focused. Focusing with a BMask works best when using bright stars so that the diffraction patterns are clear.
Maximizing Number of Faint Stars in Camera Field
Getting on the field is always the most important step for measuring and occultation, so our first recommendation is to use the BMask to achieve a reasonable focus and to acquire and confirm that you are on the correct star field. If you are on the field and good to go with an extra half hour or so to spare, you can use the following advanced technique to achieve even better focus.
The technique involves maximizing the number of stars visible in the starfield. When you are best focused, dimmer stars will be visible that are not visible when you are less well focused. Thus, when you can see the most stars (including dim ones) is when the camera is best focused. Note that the adjustments we are talking about are very very small. You should tweak the focus knob ever so slightly and then wait 20-30 seconds for the image to resettle and to make a mental map of how many stars you can see. You can then tweak ever so slightly again and wait another 20-30 seconds to compare. You can continue to do this until you go through best focus to the other side and then you can go back down to best focus. We recommend the following order of operations to maximize the efficiency of this process:
STEP 1: Starting at the best focus you were able to achieve with the BMask, make very very minor adjustments by turning the focuser knob ever so slightly clockwise. Wait 20-30 seconds between each tweak and keep track of whether you are seeing more faint stars (focus getting better) or less faint stars (focus getting worse).
STEP 2a: If the focus is getting better as you turn the focuser clockwise, continue this adjustment until you go through best focus (maximum number of dim stars). After the focus starts to get worse and the faintest stars disappear, start tweaking the focuser counterclockwise ever so slightly to go back to best focus.
STEP 2b: If the focus started getting worse from the get-go as you went clockwise in Step 1, tweak the focuser counterclockwise and go through best focus (maximum number of stars). After the focus starts to get worse and the faintest stars disappear, return to tweaking the focuser clockwise to go back to best focus.
The only difference between Step 2a and Step 2b is which direction you had to tweak the focuser to get to best focus depending upon where you started. It is possible that you were already in best focus and will end up returning to the same point where you started. In either case, you are trying to maximize the number of faint stars that you can see in the field.