STEP 1 of 9: Set Up CPC-1100 Telescope
- Set up and level tripod
- Unlatch the webbing holding the tripod legs together.
- Carefully spread the three tripod legs at the same time. This can be done effectively by bracing one leg between your feet and pulling the other two legs open at the same time.
- Tighten the brace that keeps the three legs spread apart.
- Level the tripod. One approach is to set the tripod down in different orientations to see if it sits level. If this does not work, adjust the length of the tripod legs to level the base. A level mount will make telescope alignment and pointing more accurate. It is also good to keep the legs as short as possible for stability. Mount the telescope on the tripod (teamwork makes this easier).
- Loosely tighten the altitude and azimuth clamps before lifting the telescope.
- Lift the telescope using handholds on the fork mount.
- Place the telescope on the tripod and align on the center pin being careful not to bump or move the tripod legs.
- Make sure that the azimuth clamp is tightened and rotate the mount until it falls into position with the three recessed bolts.
- Tighten all three recessed bolts on the tripod base.
- Attach telescope accessories (eyepiece, star diagonal, hand control, Telrad)
- Loosen the altitude clamp and orient telescope horizontally with the finder scope bracket on top. Firmly tighten both the altitude and azimuth clamps.
- Attach telescope back and diagonal to back end of scope.
- Attach hand control cradle and plug in hand control.
- Attach Telrad to telescope tube and turn on Telrad to confirm power.
- If there is any chance of dew during your observing period, secure the dew shield to front end of telescope using Velcro strips before aligning. (Note: the judicious use of a hand-held hair dryer works when dew is heavy or the telescope is pointed near the zenith and the dew shield is ineffective.)
- Connect telescope power
- Secure the power cable to the fork arm handle with an overhand knot and plug the power cable into the telescope
- Connect splitter to battery pack and plug telescope cable into one of the female cigarette-lighter plugs.
- If necessary, align the Telrad. (This typically only needs to be done once as long as one is careful with attaching, detaching, and storing the Telrad each night.)
- Remove lens cap from front end of telescope.
- Find recognizable object (feature on horizon) in Telrad by moving telescope by manually or using hand control (Note that telescope must be powered on to use hand control.)
- Place an eyepiece in the diagonal and check to see if object is centered in the field of view. If not, move telescope until object is centered in eyepiece.
- Use three adjustment screws on back end of Telrad to align red bulls-eye on object. (Note that the telescope is not yet tracking, so objects in the sky will quickly change position in eyepiece.)
- Tips and Tricks: If it is dark and no features or distant lights are visible on the horizon, align the Telrad using the North Star since it doesn’t move.
STEP 2 of 9: Set Up Camera System
- Attach focal reducer to Mallincamera
- Remove lens cap off camera.
- Screw focal reducer onto camera.
- Put the camera lens cap in the focal reducer bag.
- Connect Mallincamera to IOTA-VTI
- Connect power and data connectors to camera.
- Secure the cable to the fork-arm handle with an overhand knot making sure that there is enough slack for the full range of altitude motion.
- Insert data cable into VIDEO IN socket on IOTA-VTI.
Tips & Tricks: Also secure the cable to the bottom of a tripod leg with an overhand knot making sure that there is sufficient slack for the full range of azimuth motion.
- Connect power to Mallincamera and IOTA-VTI
- Find cigarette lighter cable with two power connectors.
- Plug one power connector into IOTA-VTI power socket.
- Plug other power connector into power socket on camera cable.
Tips & Tricks: You can prevent the cables from becoming accidentally unplugged by looping one over the other as you would at the beginning of tying a bow or square-knot then plug them together in the reverse direction. - Plug the cigarette-lighter plug into second female cigarette-lighter socket coming off the battery supply. Check to make sure that power lights are on for both Mallincamera and IOTA-VTI.
- Connect IOTA-VTI to ACER netbook computer
- Insert end of gray video cable with yellow stripe connector into VIDEO OUT socket on IOTA-VTI.
- Wake up computer and open to desktop.
- Plug USB end of cable into USB port on either side of computer.
- Open VirtualDub on netbook to record data
- Double-Click on VirtualDub icon on desktop of computer.
- Select FILE -> CAPTURE AVI.
- If the screen turns green or black, press the letter “P” to enter into preview mode. You should then be able to see signal coming from camera and IOTA-VTI.
- Select AUDIO and click on ENABLE AUDIO CAPTURE to turn off audio recording (setting will become unchecked).
- Select FILE -> SET CAPTURE FILE (F2).
- Create or navigate to desired event folder (named YYYYMMDD where this is the UT date of observation).
- Under FILE NAME, enter YYYYMMDD_01 where YYYYMMDD is the UT date. To confirm, filename you entered should appear on top border of VirtualDub window.
STEP 3 of 9: Align Telescope
- Prepare to align telescope
- Turn telescope power on.
- Loosen altitude and azimuth clamps and manually move the telescope into vicinity of first target alignment object.
- Tighten both the altitude and azimuth clamps.
- Hand control should read “CPC Ready / Press ENTER to begin alignment.”
- Press ENTER.
- Determine preferred alignment procedure based upon sky conditions:
- SkyAlign – Align telescope on any three bright stars. (Use when you can see at least three bright stars in sky.)
- Two Star Align – Align telescope on two known bright stars. (Use when too cloudy to see more than two stars in sky and you can know their names.)
- One Star Align – Align telescope on a single known bright star. (Use when too cloudy to see more than one star in sky and you know its name.)
- Solar Sys.Align – Align telescope on moon or a planet. (Use when too cloudy to see more than one star in the sky and you can identify planet.)
- Select preferred alignment procedure
- Use SCROLL buttons (6 and 9) to select preferred alignment option
- Press ENTER
- If needed, wait for telescope to lock with GPS signal. If telescope fails to lock, turn off telescope and try again (or enter GPS coordinates by hand using information from IOTA-VTI). See also note below regarding checking whether telescope GPS is turned on or off.
- If you have selected SkyAlign above, display will read “SkyAlign / Use the following screens to select three bright stars. Press ENTER to continue.”
Tips & Tricks: If conditions permit, use stars that are well separated in the sky and are more in a triangle rather than a straight line.- Press ENTER to continue.
- Center Object 1
- Use hand control to center Object 1 in Telrad. Telescope will slew at a relatively fast rate.
- Press ENTER. Telescope will now move at a slower rate so you can center object in camera.
- Align Object 1
- Using the camera, align Object 1 in center of field of view. NOTE: Use UP and RIGHT buttons for final approach.
- When star is aligned in camera field of view, press ALIGN (This is a good time to check the telrad to refine its alignment to match the center of the telescope field of view with the camera attached.)
- Center Object 2
- Use hand control to center Object 2 in Telrad. Telescope will slew quickly.
- Press ENTER. Telescope will now move at slower rate.
- Align Object 2
- Using the camera, align Object 2 in center of field of view. Use UP and RIGHT buttons for final approach.
- When star is aligned in camera field of view, press ALIGN
- Center Object 3
- Use hand control to center Object 2 in Telrad. Telescope will slew quickly.
- Press ENTER. Telescope will now move at a slower rate.
- Align Object 3
- Using the camera, align Object 3 in center of field of view. Use UP and RIGHT buttons for final approach.
- When star is aligned, press ALIGN
- Wait for hand control to indicate “Match Confirmed”
- Hand control should indicate “Align Success.” (NOTE: If hand control indicates “Align Failed”, try again. Turn off telescope and return to beginning of STEP 3.)
- Press ENTER to continue (or press BACK to view the objects used and then press ENTER to confirm.) This last step is important for completing the alignment procedure.
- Hand control should now state “CPC Ready”
NOTE ABOUT GPS: If having trouble with GPS lock, use steps below to confirm GPS status
- Press MENU
- Use SCROLL BUTTONS (6 and 9) to select UTILITIES and press ENTER
- Use SCROLL BUTTONS to select GPS ON/OFF and press ENTER
- If display reads “Press ENTER to turn GPS off,” then the GPS is turned on already. If you press ENTER at this point, the GPS will be turned off. If you want to keep GPS on, use the BACK button to return to the “CPC Ready” display.
- If display reads “ Press ENTER to turn GPS on,” then the GPS is turned off. Press ENTER at this point to turn the GPS on. If you want to keep GPS off, use the BACK button to return to the “CPC Ready” display.
STEP 4 of 9: Fine-focus Telescope
- While telescope is pointing at bright star (typically final alignment star), place Bahtinov mask over front end of telescope. Star image should change to show an “X” shape with a line running through it.
- Adjust the focus of the telescope until the line direcly intersects the center of the “X” shape.
- Remove Bahtinov Mask. Telescope should now be focused.
Tips & Tricks: If you are using the dew shield it may be difficult to place and remove the Bahtinov mask. One way to do it is to use the altitude control to bring the telescope down to nearly horizontal, and then you can easily reach in and insert the mask. Use the altitude control to raise the telescope back up to the target star so that you can adjust the focus. Remove the mask in a similar fashion. - If dew is forming, cover the Telrad with a baggie in case you need to use it again later.
STEP 5 of 9: Record Position Information for Event
Depending upon the version, it can take the IOTA-VTI up to 10 minutes after power-up to correctly record time and position information. For some set-ups, this will include a message appearing on the screen to indicate that the almanac has been updated by 1-2 seconds. Typically, the alignment and focusing procedures take long enough that you can now record position data from the IOTA-VTI as described below.
- Confirm that IOTA-VTI is set to FULL SCREEN. (This setting is preferred over TV SAFE for all RECON events.)
- Set the other switch on the IOTA-VTI to POSITION
- Press F5 on computer to record 5 seconds of video showing site information being output by IOTA-VTI. (This will typically be your first recording of the night and have the filename YYYYMMDD_01. During recording, you should see the filename of the recording at the top of the VirtualDub window.)
- Press ESC to stop recording.
- Set the switch on the IOTA-VTI back to TIME.
- On the Observation Log, label the file “Position” and include the filename suffix (e.g., _01).
STEP 6 of 9: Locate the Target Occultation Star Field
After telescope has been aligned and focused, hand control should read “CPC Ready.” You can now use the “star train set” to acquire the target field. The star train set lists nearby stars that are should be bright and noticeable. For example, in the star training set below, star Aldebaran is a very bright star (magnitude 0.8) located 19.54 degrees from the target (13WV107). Star PPM 094619 is a dimmer but still noticeable star at magnitude 5.9 that is only 1.64 degrees from the target.
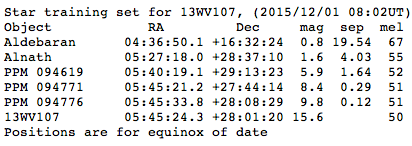
Sample Star Training Set
By pointing the telescope at these noticeable stars, you can determine how accurately the telescope is aligned and whether that alignment systematically places each target in a particular part of the camera field of view. With this information, you can then point the telescope towards the target field and know where the field will be located in the camera field of view.
For most events, you should be able to use GOTO RA/DEC to point the telescope. This procedure is outlined below.
- Press MENU (7).
- Use SCROLL buttons (6 and 9) to select GOTO RA/DEC and press ENTER.
- Use numbers on keypad to enter the RA value for a star train object and press ENTER. (NOTE: Use BACK key to make corrections.)
- Use the SCROLL buttons (6 and 9) to toggle between + and – DEC setting and press ENTER.
- Use numbers on keypad to enter DEC values and press ENTER. (NOTE: Use BACK key to make corrections.)
- Telescope will slew to the RA and DEC values that you entered.
- Find the star train object in the field of view of the camera or telrad.
- Move telescope as needed to center star in camera.
- Note the direction and distance required to center object
- Next, repeat the previous steps to point telescope to additional star train objects. Center each star train object in the camera, again noting the required offset in direction and distance. The offset should be similar for each star train object.
- Finally, repeat the these steps to point telescope at target field. Move the telescope using the same offset direction and distance determined with previous objects. Telescope should now be centered on the target field.
- Confirm target field using star chart
- Compare the camera view with the star chart provided for the target object. This is typically done using a higher sense-up value to be able to see fainter stars in field.
- Confirm pointing by identifying recognizable star patterns. Note, image will be inverted in camera, but star charts have also been inverted to match camera configuration.
- Note that the orientation of the image will depend upon the time of night that you are observing. Using an ALT/AZ mount, the star field will rotate throughout the night. You may need to rotate the orientation of your star chart in order to find the correct orientation.
- Note also that the star charts provided by RECON assume that you are using the star diagonal, which inverts the image.
Tips & Tricks: You can pre-save RA/DEC values into the computer memory from the comfort of your warm home if you like.
NOTE: While not necessary, you can also use PRECISE GOTO to point the telescope. This is another option found under MENU. When you enter coordinates into PRECISE GOTO, you will next be asked to select from a list of nearby bright reference stars. When you select one of these, the telescope will slew to the reference star and ask you to center it in the camera field. The telescope then uses this offset correction to slew to the RA/DEC that you entered. One bug with this procedure is that often the telescope will list the name of a previously acquired star in the hand paddle. You can ignore this or press the BACK key to remove bogus star name from hand paddle.
STEP 7 of 9: Record Occultation
- Confirm that the target star is away from any hot pixels.
- Adjust the sense-up on the camera to the recommended setting for that occultation (preferably five minutes before recording so camera can adjust to new sense-up).
- At the beginning of the recording window, press F5 on computer to begin recording
Tips & Tricks: Set an alarm on a cell-phone to sound either a two-minute or a one-minute warning. No matter what you are doing, even if you are not yet on field, start recording at the designated time while you continue trying to get onto the target. Each community has a slightly different recording window. This is listed on the RECON Event Detail Page for each event. - NOTE: You can confirm data is being recorded by checking the following indicators:
- Values at the bottom and/or right side of the VirtualDub window will show the video length and file size increasing as the recording is made.
- The tab at the top of VirtualDub will indicate the name of the file being recorded (e.g., YYYYMMDD_02).
- At end of the recording window, press ESC to stop recording.
- On the Observation Log, label the file “Event Video,” record the sense-up being used, and include the filename suffix (e.g., _02).
- If you have not already done so, have each participant write their name on the Observing Logsheet and make sure that you have listed the UT data on the sheet (YYYYMMDD). The UT data along with the filename suffix allows us to identify each filename.
- If you had to skip Step 5 above due to technical issues prior to the event, this is a good time to record 5 seconds of video showing latitude and longitude POSITION information from IOTA-VTI (see Step 5).
STEM 8 of 9: Record Sky Field and Dark Field Videos
- Take sky field video
- After the event, you should leave the camera system powered on, but turn off the power to the telescope. The telescope will stop tracking and you will notice that stars start to drift through the field.
- Take a 2 minute video of drifting stars. The video will be used to create a sky-field image for use during data processing.
- Label this file “Sky Field” on the Observation Log, record the sense-up used, and include the filename suffix (e.g. YYYYMMDD_03).
- Take dark field video
- After recording the sky field video, you should cover the front end of the telescope with the lens cover.
- Record an additional 2 minute video with no light entering the telescope. This video will be used to create a dark-field image for use during data processing.
- Label this file “Dark Field” on the Observation Logsheet, record the sense-up used, and include the filename suffix (e.g. YYYYMMD_04).
STEP 9 of 9: Take Down
- Turn off power
- Exit capture mode and close VirtualDub.
- Turn off telescope power using the ON/OFF switch on the telescope.
- Turn off camera and IOTA-VTI power by unplugging cigarette lighter.
- Shut down the laptop or set to hybernate.
- Store camera system and telescope accessories in small see-through plastic accessories container
- Disconnect and store cables connecting laptop, IOTA-VTI, and camera.
- Pack IOTA-VTI in timer storage box.
- Remove and store focal reducer.
- Cover camera with lens cap and store in camera storage box.
- Turn off Telrad, remove it from telescope and store in Telrad storage box.
- Disconnect and store hand control and telescope power cable.
- Remove, cover, and store diagonal and telescope back in storage containers.
- Camera, IOTA-VTI, telescope accessories, cables, and laptop are stored in small see-through plastic accessories container.
- Store telescope, Bahtinov Mask, and dew shield in large black telescope container
- If used, remove dew shield from front end of telescope.
- While telescope is still horizontal, cover the back end of telescope with appropriate cap.
- Place lens cover on front end of telescope and twist to lock.
- Unlock altitude clamp and point telescope facing down, then re-lock the clamp.
- Unbolt the three bolts at the base of the telescope.
- Lift telescope off the tripod and store in large telescope crate, fork handle facing up. IMPORTANT: Make sure that the base of the telescope is on the side of the crate with wheels. This will protect the telescope when lifting the crate using crate handle.
- Loosen the altitude and azimuth clamps.
- Store Bahtinov Mask and dew shield in large telescope crate.
- Store tripod
- Unscrew and rotate the tripod brace.
- Carefully close tripod legs at the same time
Tips & Tricks: Lift the circle in the center of the three braces straight up. - Latch webbing to keep tripod legs together.