
On a regular basis, each RECON team should use the following guide to confirm that their camera system is configured properly. This procedure can be done inside or outside during the day or night and does not require setup of the telescope. More information on the MallinCamera is available at the Main Camera Page.
Materials needed:
- MallinCam
- IOTA-VTI
- RECON laptop
- Power supply
- Power cable with splitter
- Data/power cable for MallinCam
- USB-Video Adapter Cable
STEP 1: CONNECT CAMERA, IOTA-VTI, AND LAPTOP
Connect the IOTA-VTI and MallinCam to your power supply. Connect the MallinCam to the IOTA-VTI using the data cable. Connect the IOTA-VTI to the RECON laptop using the USB-video adapter. You can leave the protective lens cap on the MallinCam throughout the procedure.
STEP 2: OPEN VIRTUALDUB
Double-click the VirtualDub icon the computer desktop. At the top-left of the VirtualDub window, click File then Capture AVI… to put the software in capture mode.
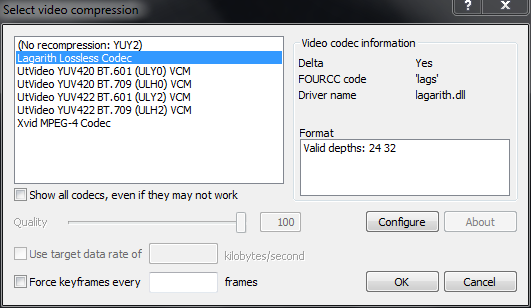
STEP 3: CONFIRM LAGARITH CODEC
Select the Video menu and scroll down to select Compression… to make sure that Lagarith Lossless Codec is selected, as shown below.
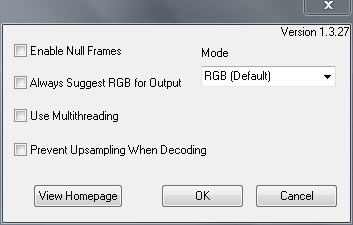
Click on the Configure submenu button. Check that none of the boxes are checked as shown below.
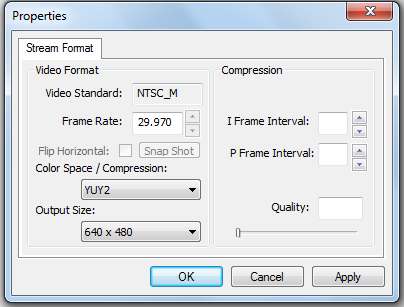
STEP 4: CONFIRM CAPTURE PIN
To confirm that VirtualDub is configured to take data using the same scaling as the camera, select Video -> Capture pin… and confirm that the Output Size is set to 640×480 and Color Space/Compression is set to YUY2 as shown below. Click OK to save.
Note that for some of our sites, going through this step of the procedure has led to the display turning green. If this is the case for your site, you can permanently resolve this issue through the following procedure:
- Select Video -> Preview (or press the hotkey “P“) – This will switch Virtual Dub into “Preview” mode and you should be able to see the camera display again.
- Select Device -> Device settings…, check the box titled “Save current display mode as default,” then select OK. This should set Virtual Dub to use Preview mode moving forward.
STEP 5: CONFIRM CAMERA SETTINGS
If desired or requested, you can record this step using VirtualDub to upload to SWRI in Boulder. We recommend following the same convention as in observation campaigns, saving the file in subdirectory C:/Users/RECON/Data/YYYYMMDD for the given UT date and naming the file YYYYMMDD_## (where _## is the next number in the sequence for that date, e.g., _01, _02, etc). You can record as you are checking the following settings to document what the camera settings were immediately prior to and following this step.
There are four buttons on the back end of the MallinCam —four are arrow keys and a center menu button labeled with a rectangle.
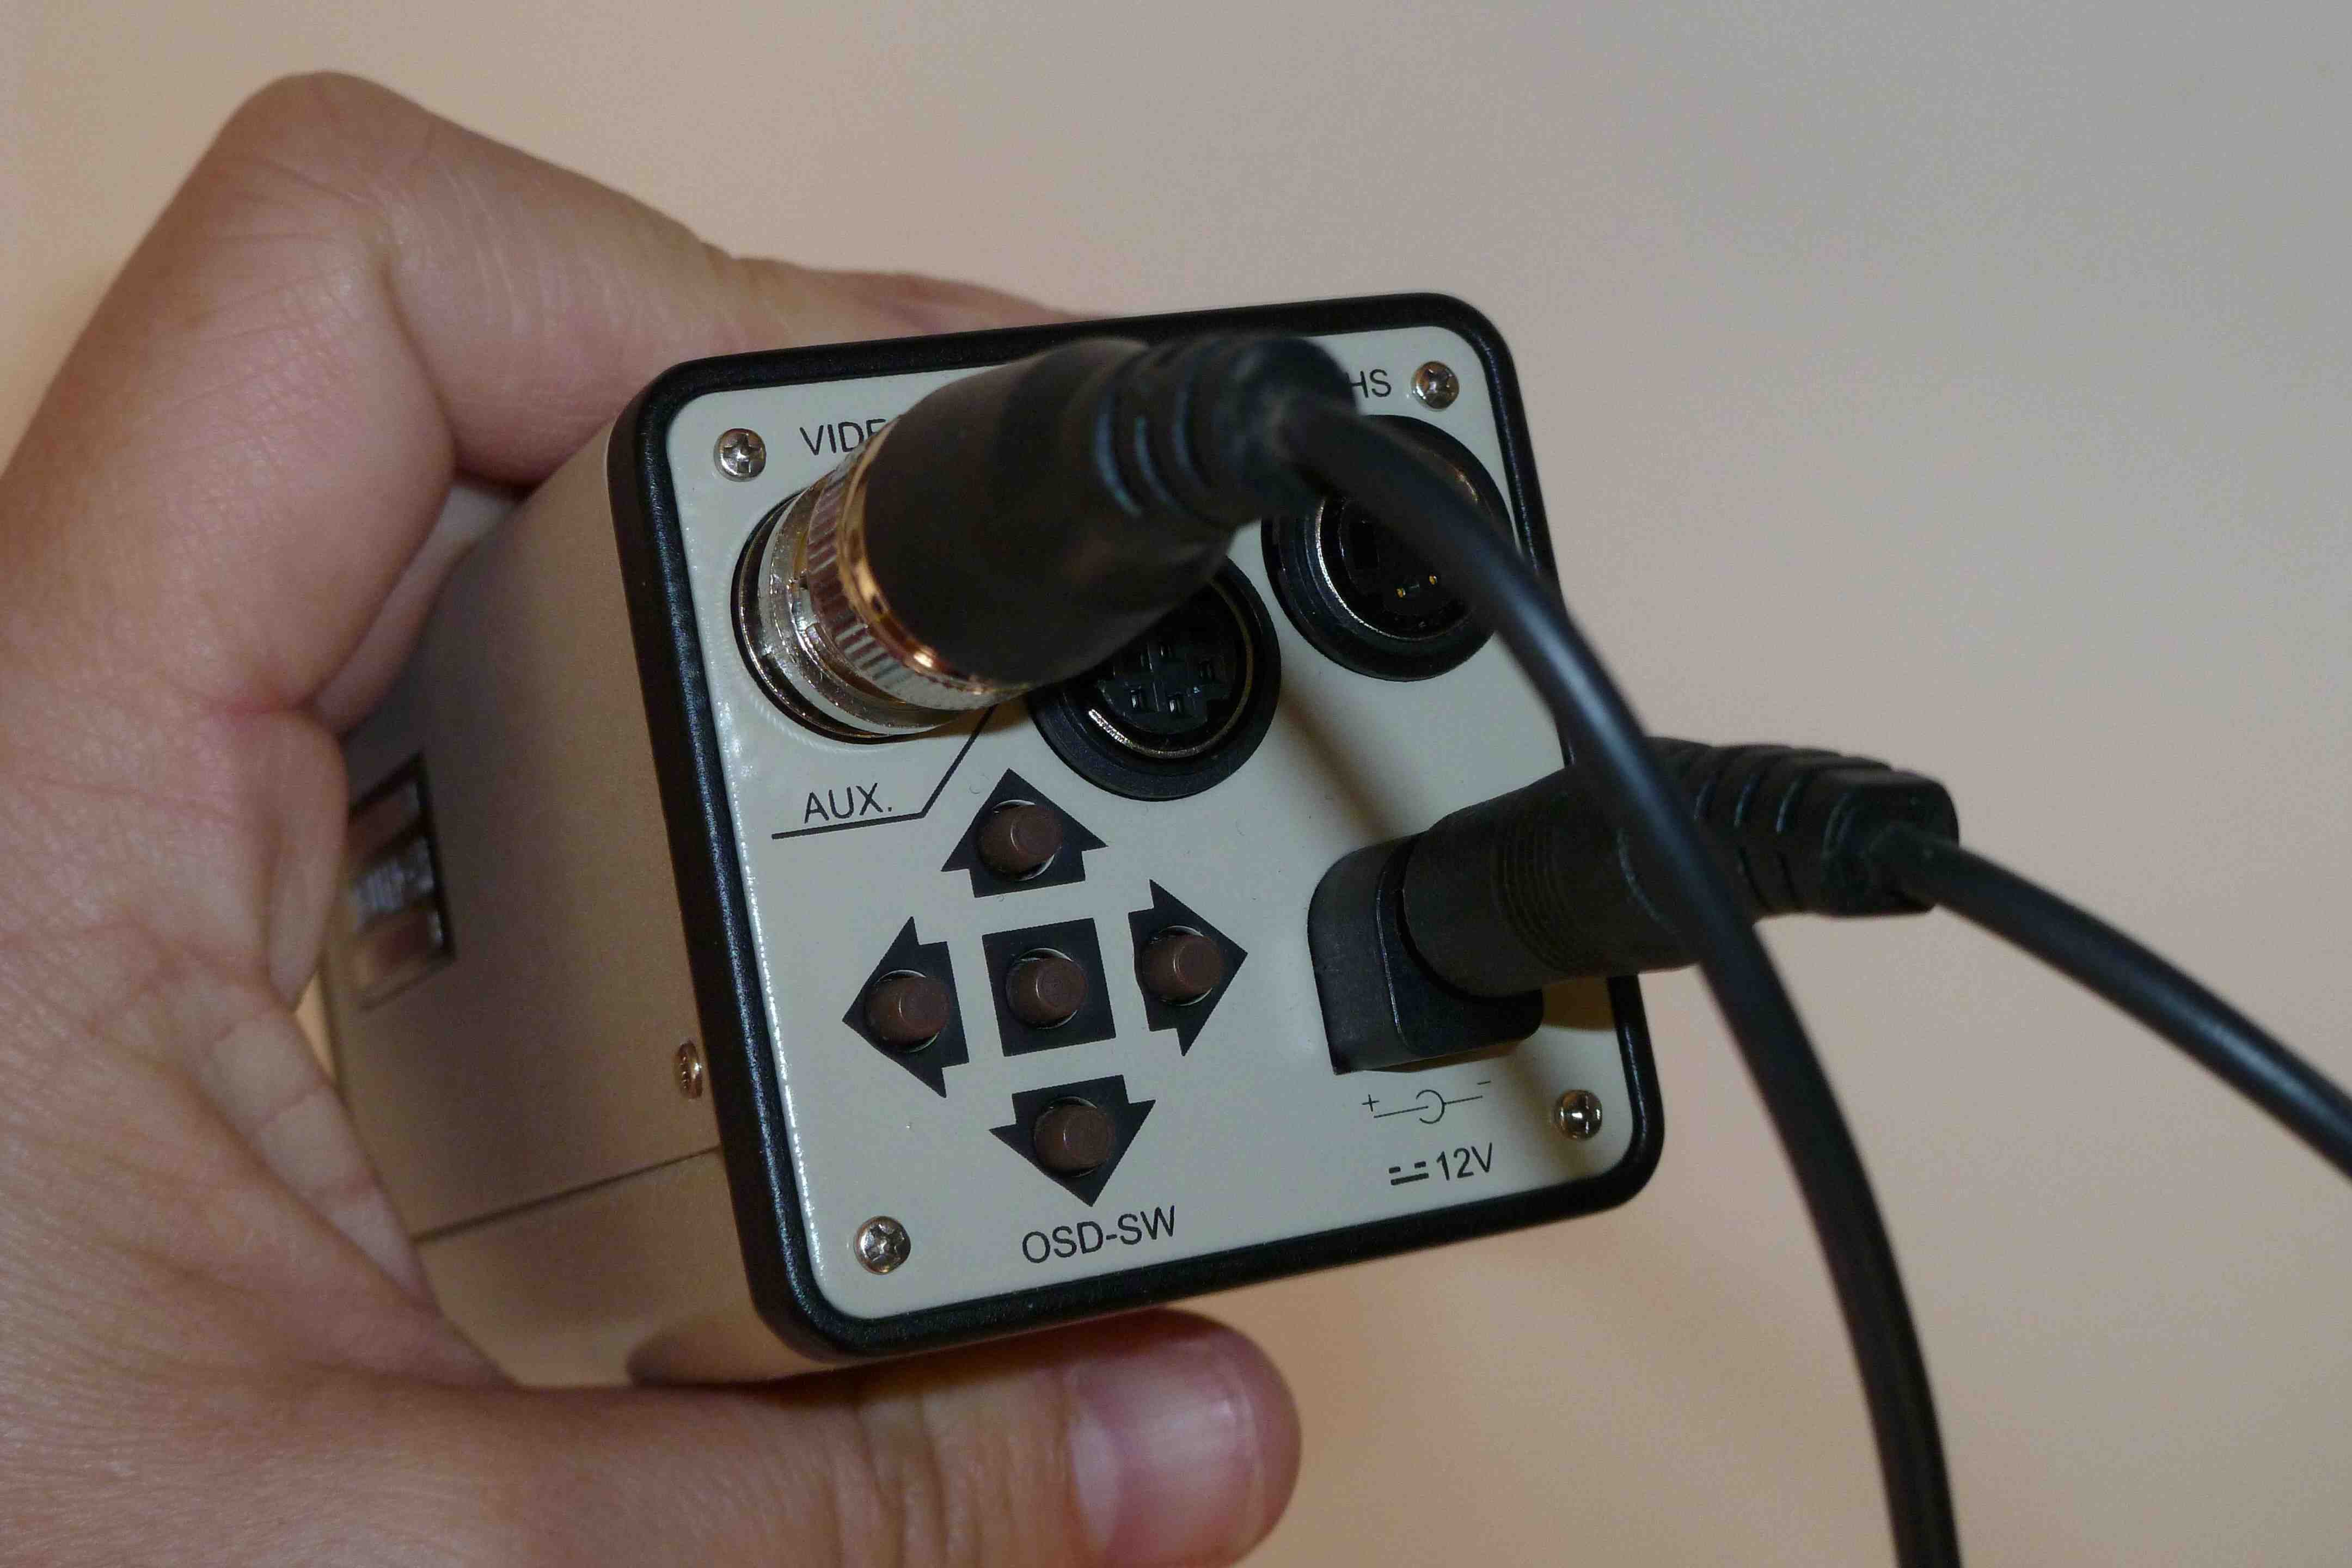
Menu buttons on back of MallinCam
When you press and hold the center menu button, the following screen will appear. Apart from the “Sense Up” setting (which controls the integration time for each camera exposure) you should be sure that all of your camera settings are set as follows. Note in particular that ALC/ELC should be set to ALC, BLC should set to ON, and AGC should be set to MANU. To change a menu setting, use the UP/DOWN arrows to move to a setting and use the LEFT/RIGHT arrows to change the setting.
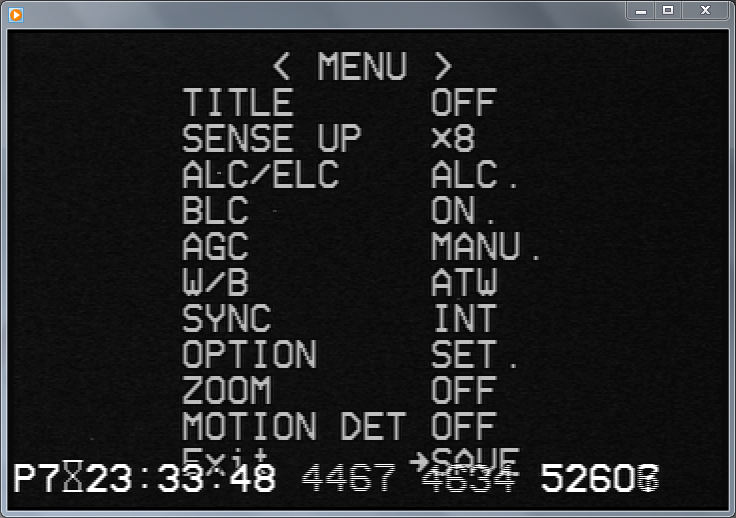
Mallincam main menu settings
Four of the above settings have submenus. Each of these is highlighted on the main menu with a “dot” or “period.” To access these submenus, scroll down to the menu setting using the UP/DOWN arrow keys and then press the center menu button.
The ALC/ELC setting should be set to ALC and the submenu should be set as follows with the SHUTTER OFF and the LEVEL set all the way to the right.

ALC Submenu
The BLC setting should be set to ON and the submenu should be set as follows:
Mallincam BLC submenu settings
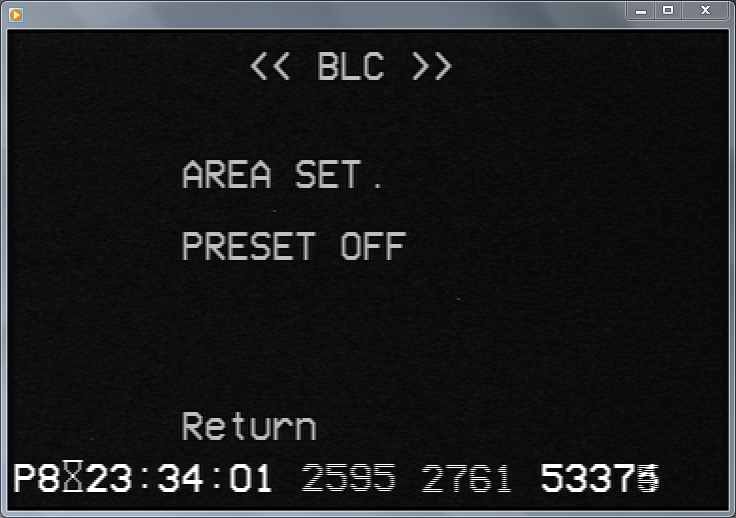
Note that the BLC AREA SET setting has an additional submenu (as indicated by the period shown). Select this submenu and adjust the resulting screen as follows. Use the UP/DOWN and LEFT/RIGHT buttons to navigate to a particular grid box and use the center button to toggle between highlighted and black. After you have finished configuring the AREA SET submenu to look like the screen below, press and hold down the center button until you return to the BLC submenu. (Note that you can exit the screen from any grid box; just be sure hold down the center button after you press it.) Use RETURN to get back to the main menu.

Mallincam BLC area set configuration
Back at the main menu, the AGC setting should be set to MANU and the submenu should be set as follows with LEVEL set to MAX.
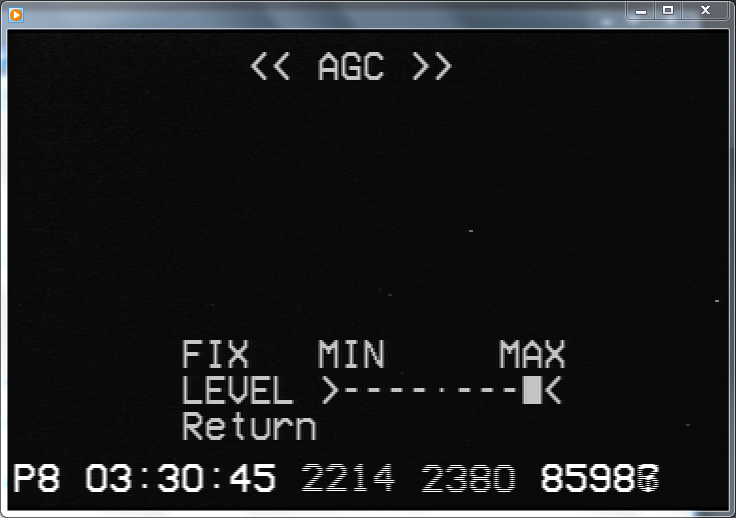
AGC Submenu
The OPTIONS submenu should be set as follows. Note that GAMMA should be set to 0.45.
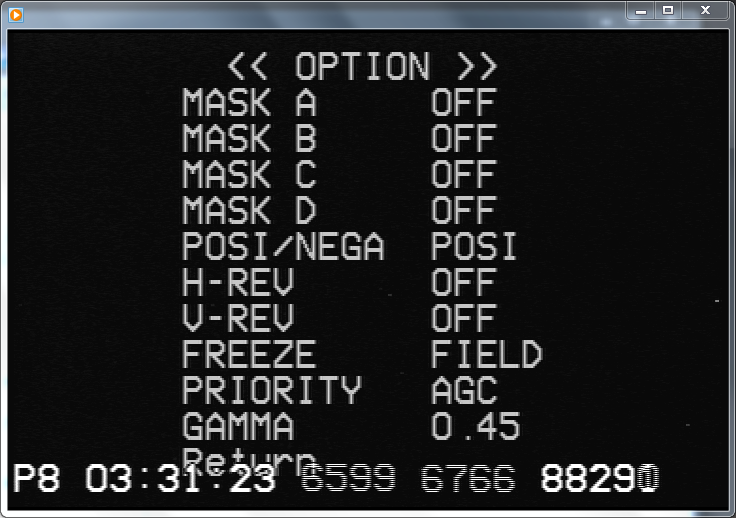
OPTIONS Submenu
After you have confirmed all of the above settings, scroll to the Exit line on the main menu and press the center button to SAVE.
STEP 6: HAVE A GREAT DAY!
Congratulations! Thank you for regularly confirming that the above settings on VirtualDub and your MallinCam are properly configured. You can now close VirtualDub and store all of your equipment back in your RECON storage container.
Click here to return to the guide on using the VirtualDub to capture video data from the MallinCam.