
Overview of RECON Data Transfer Tool
In December, 2015, the RECON project implemented use of cwrsync as a tool for transferring data to Southwest Research Institute (SwRI), Marc Buie’s home institution in Boulder, Colorado. Each RECON site requires uniquely configured copy of cwrsync, and Marc and John have been working with teams to configure the tool properly using the cwrsync Installation Guide.
Once installed, your team will have an application icon labeled “cwrsync” on your desktop. When selected, this tool will connect your laptop with a server at SwRI in Boulder and compare the contents of all directories and files found in your C:\Users\RECON\Data folder with those that have been received in Boulder. If there are any additions or changes since the last time the machines were synched, the tool will upload these to Boulder. The tool will provide an upload status report as it is transferring files. If there is a loss of connection, the tool will continue with the data transfer after it has been restarted.
Organizing Files to Transfer
Because cwrsync transfers files from C:\Users\RECON\Data, it is important to make sure your files are organized correctly in this directory as outlined below before you run the data transfer tool. If your RECON laptop does not have this folder, see the cwrsync Installation Guide.
Within C:\Users\RECON\Data, you should have a separate folder for each night of observing that is labeled by the UT data for that session in the format YYYYMMDD. Within this folder, each of your video files should also be labeled with the same date as the prefix. As Virtual Dub saves video files, it will increment the last digits of each file (_01, _02, _03, etc). For each file, you should document the contents of the file on your RECON Observation Logsheet. Provided as an example below, you can record up to 99 videos on a given night:
- C:\Users\RECON\Data\YYYYMMDD
- YYYYMMDD_01 (first video file of the night, e.g. IOTA-VTI position data)
- YYYYMMDD_02 (second video file of night, e.g. first star field video)
- YYYYMMDD_03 (third video file of night, e.g. next star field video)
- YYYYMMDD_04 (fourth video file of night, e.g. another star field video)
- YYYYMMDD_05 (fifth video file of night, e.g. sky field video with tracking off)
- YYYYMMDD_06 (sixth video file of night, e.g. dark field video)
- … (you could save up to 99 video files on a given night using this schema)
- YYYYMMDD_log (scan of Observation Logsheet or txt file with data transcribed from logsheet; this file describes all of the video files taken that night)
In the list above, we have provided examples of the types of data that you might collect, but this will depend upon what you are recording during any given observing session. The idea is that each video you take on a given night has a unique filename that is also linked to the UT date on which it was taken. Virtual Dub will index to a new file suffix with each successive video. Your logsheet (which can be either a scan of your written notes or a txt file describing the observing conditions and the contents of each video file) provides important documentation of the contents of each video taken that night.
Uploading Event Folders
After you have organized your files in C:\Users\RECON\Data, your data is ready to be uploaded:
- Open cwrsync by clicking on desktop icon
- If a Security Warning window appears, select Run
- A cwrsync window will open with information on the data transfer status. The tool will copy any new directories and files found in C:\Users\RECON\Data to the RECON master storage and backup computer in Boulder. Note that this will likely take a long time (several hours or possibly days depending upon file sizes), so we recommend you plug in the laptop and let the program run continuously until the transfer is complete. (You should also want to avoid using any internet provider where you are paying by the gigabyte!)
- After data transfer is complete (or if you need to interrupt data transfer at any time), close the cwrsync window.
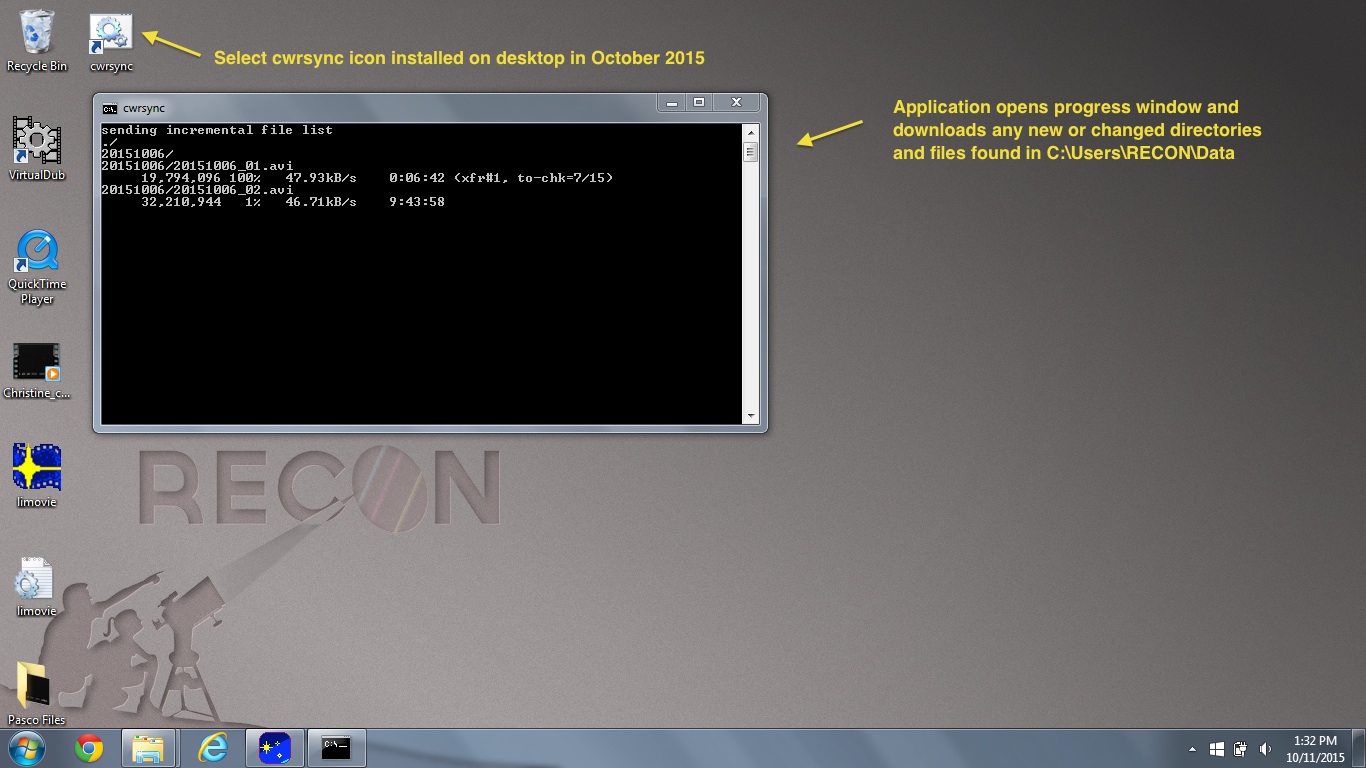
Screen shot of cwrsync data transfer tool at work
How do you know if all your files were transfered?
If all data has been transferred from C:\Users\RECON\Data to Boulder, you will receive a message similar to the one shown below. While your numbers will not agree exactly, you should notice that the amount of transferred data listed is very small (in the case below, 714 kbytes sent and 41 kbytes received). You will also see the messages “Press any key to continue . . .” When you press any key to continue, the cwrsync window should close.
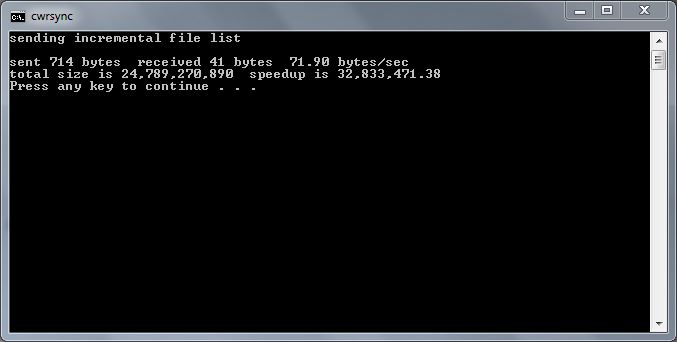
Data Transfer Tool confirmation message if all files in Data directory have been transfered
Additional Notes about cwrsync
- Nothing is ever deleted from the Boulder computer. Note that if you create a file, transfer it, then move the file to another folder within C:\Users\RECON\Data, it will be resent and there will be two copies in Boulder. For each event, you should therefore try to finish any cleanup and organization of files before transferring.
- Once you know the files are safe in Boulder, they can be deleted locally off your laptop if the laptop is running out of disk space, but this likely won’t be 1-2 years after you take the data. There is no penalty for keeping your files around for a while as long as you don’t fill up the disk.
- The folder C:\Users\RECON\Data is a working research directory and should therefore be kept clean and organized. All files will be in directories named for the UT date of the night you collected them (YYYYMMDD). This is in keeping with the procedures discussed in training sessions. The difference now is that all of your related files such as logsheets, limovie output files, small extractions, can be saved here as well.
- The file transfer tool can be killed at any time and restarted later. If you have a network drop out and the transfer dies on its own, just restart. You also now get some indication of how the transfer is proceeding.
- The zip files sent out to each RECON site are keyed to that particular site. That means the directory where the data are stored is the same for a site. If you need a separate repository, a new zip file needs to be generated to go with the new site. Multiple computers from the same site can use the same zip file but this is not recommended for the normal RECON sites. This option is more for the volunteer teams using their own computers.
- Do not share the zip files with un-trustworthy individuals or post them on web sites or other data repositories.